The Unexpected Search: Why FL Studio Forums Won't Light Up Your Stream
In the vast digital landscape, content creators often find themselves navigating a myriad of forums and communities in search of answers to their burning questions. From audio production to video editing, there's a specialized corner for almost every niche. However, a common misconception, perhaps due to the pervasive nature of digital content creation, sometimes leads individuals down an unexpected path. Specifically, when searching for essential setup advice, many Twitch streamers might, surprisingly, stumble upon forums dedicated to digital audio workstations (DAWs) like FL Studio.
The title of this article, "No Studio Lighting Tips Found in FL Studio Forum Releases," might seem self-evident to seasoned tech enthusiasts, but it highlights a crucial point. For those primarily focused on sound design and music production, FL Studio forums are an invaluable resource, bustling with discussions on everything from synthesizer presets to mixing techniques. Yet, for those seeking to enhance their visual presentation, particularly with high-quality studio lighting for Twitch streamers, these specialized audio communities simply aren't the right destination. Our research into recent FL Studio forum releases – including the FL Studio 2025 Latest Release from July 2025, FL Studio 24.1.1 from July 2024, and FL Studio 2024.2.2 from February 2025 – consistently shows content exclusively focused on software updates, features, and troubleshooting for audio production. There is no mention, at all, of lighting equipment, camera settings, or visual aesthetics for live streaming. This isn't a failing of the forums; it's a testament to their focused purpose.
Twitch Streamer Lighting: Why FL Studio Forums Aren't the Source
It’s a common scenario: you’re building your Twitch empire, perfecting your gameplay, refining your commentary, and ensuring your audio is crisp. Then you realize something is missing – your visual presence. Your face is shrouded in shadows, your background is dull, or you’re battling harsh glare. Naturally, you hit Google, typing in "how to get good studio lighting for Twitch streamers." If, by some algorithmic twist, you land on an FL Studio forum thread, you might be left scratching your head. While FL Studio is indeed a powerful tool for crafting the perfect stream soundtrack or background music, its community's expertise lies squarely in the realm of sound, not sight.
The fundamental disconnect lies in the core function of the software itself. FL Studio is a sophisticated digital audio workstation. Its updates and discussions revolve around MIDI controllers, VST plugins, audio interfaces, mastering chains, and new features for music composition and production. The idea of finding advice on three-point lighting setups, LED panels, ring lights, or color temperature settings within these discussions is akin to looking for car repair tips in a gourmet cooking forum. Both are valuable, but their domains are distinct. To truly elevate your visual stream quality, you need to turn to communities and resources specifically dedicated to live streaming, videography, or photography. If you're still curious about this divergence, you can read more at Twitch Streamer Lighting: Why FL Studio Forums Aren't the Source.
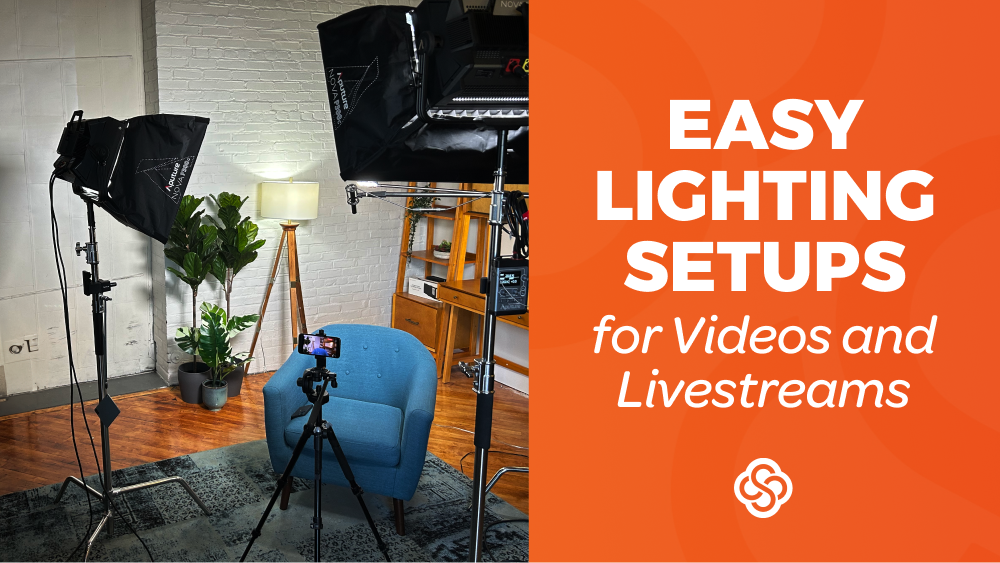
The Fundamentals of Studio Lighting for Twitch Streamers
Now that we've clarified where *not* to look, let's dive into the essential knowledge for creating stunning visual appeal on your Twitch stream. Proper lighting is arguably as important as a good microphone and camera. It can transform an amateur-looking setup into a professional broadcast, making you look better, more engaging, and ultimately, more watchable. For any aspiring or established Twitch streamer, understanding the basics of studio lighting for Twitch streamers is non-negotiable.
Key Lighting Components You'll Need
- Key Light: This is your primary light source, typically positioned in front and slightly to the side of you, angled down. Its purpose is to illuminate your face and subject clearly. For streamers, a softbox, LED panel, or a large ring light are popular choices. The goal is soft, even illumination to avoid harsh shadows.
- Fill Light: Placed opposite the key light, the fill light is used to soften or eliminate shadows created by the key light. It should be less intense than your key light, ensuring your face isn't completely flat but still well-lit. Reflectors can also serve as effective fill lights, bouncing light from your key source.
- Backlight (Hair Light/Rim Light): Positioned behind and above you, this light separates you from your background, adding depth and dimension. It creates a subtle glow around your head and shoulders, preventing you from blending into the backdrop.
- Background Light: While not always strictly part of a traditional three-point setup, a background light can dramatically enhance your stream's aesthetic. This light is used to illuminate your background, adding visual interest or setting a specific mood. RGB LED strips, spotlights, or even practical lamps can be used for this purpose.
Investing in lights with adjustable brightness and color temperature (measured in Kelvin, e.g., 3200K for warm, 5600K for daylight) will give you maximum flexibility. Dimmable lights are crucial for fine-tuning your setup and adapting to different ambient lighting conditions.
Setting Up Your Twitch Stream Lighting: Techniques and Tips
Once you have your equipment, the real magic happens in the setup. A well-placed light can make all the difference. Here's how to create an appealing and professional look for your stream using effective studio lighting for Twitch streamers techniques.
Implementing the Three-Point Lighting System
The gold standard in video production, three-point lighting is incredibly effective for streamers:
- Key Light Placement: Place your key light approximately 45 degrees to the left or right of your camera, slightly above eye level, pointing down at you. This creates natural-looking shadows that define your features.
- Fill Light Placement: Position your fill light on the opposite side of your key light, also at a 45-degree angle, but ensure it's less intense. Adjust its brightness until the shadows created by your key light are softened but not completely eliminated.
- Backlight Placement: Position your backlight directly behind you, slightly above your head, angled down. Be careful to hide it from camera view. Its subtle glow will separate you from your background, adding depth.
Beyond the Basics: Advanced Tips for Streamers
- Color Temperature Consistency: Try to match the color temperature of all your lights. Mixing warm (yellowish) and cool (bluish) lights can create an unnatural look unless done intentionally for artistic effect. Aim for a consistent "daylight" balance around 5000K-5600K for a clean, natural appearance.
- Avoid Direct Frontal Lighting: While it might seem intuitive to place a light directly in front of you, this often flattens your features and creates harsh shadows behind you. Angled lighting provides more depth and interest.
- Minimize Glare: If you wear glasses, angling your key light slightly higher or lower, or moving it further to the side, can help eliminate reflections. Experimentation is key here.
- Consider Your Background: Don't forget to light your background if it's visible. A subtle splash of color with an RGB light or simply illuminating a bookshelf can add visual interest. A well-lit background helps prevent you from looking like a floating head in a dark void.
- Use Diffusion: Softboxes and diffusers are your best friends. They spread light evenly, reducing harshness and creating a more flattering glow. Ring lights inherently provide soft, even frontal lighting.
- Eye Lights: A ring light is excellent for creating a pleasant "catch light" in your eyes, making them sparkle and appear more engaging. Even a small LED panel positioned correctly can achieve this.
Common Lighting Mistakes and How to Avoid Them
Even with the right equipment, it's easy to fall into common lighting pitfalls that can detract from your stream's quality. Being aware of these can help you troubleshoot and perfect your setup for optimal studio lighting for Twitch streamers.
- Too Much Light, Too Little Thought: Simply blasting yourself with the brightest lights available often results in overexposure, blown-out features, and an uncomfortable viewing experience. More light isn't always better; better placement and diffusion are.
- Ignoring Shadows: While you want to soften harsh shadows, completely eliminating them can make your face look flat and two-dimensional. Shadows add contour and definition, so aim for soft, flattering shadows rather than none at all.
- Inconsistent Color Temperatures: As mentioned, mixing warm household lamps with cool LED panels creates an unharmonious look. Ensure all visible lights are calibrated to the same color temperature.
- Neglecting the Background: A perfectly lit streamer against a dark, uninteresting background creates a visual imbalance. Even a subtle light on your backdrop can make a huge difference in overall presentation.
- Bad Angles Leading to Glare or Underexposure: Poorly angled lights can cause significant glare on glasses or monitors, or leave parts of your face in shadow. Take the time to adjust angles incrementally and observe the results on your camera feed.
- Not Testing Before Going Live: Always do a quick test stream or record a short clip before going live. Check how you look on camera, scrutinize your lighting, and make adjustments. This proactive step can save you from an awkward broadcast.
If you're still hunting for lighting solutions in unexpected places, remember that dedicated streaming communities and photography resources will offer far more practical assistance. For further reading on this topic, you might find insight at Searching for Twitch Lighting? FL Studio Updates Offer No Help.
Conclusion: Illuminate Your Stream, Not Your DAW Forums
While the allure of finding all your content creation answers in one place is strong, it's important to direct your search to the appropriate communities. FL Studio forums are a powerhouse for audio production, but they will never be the source for enhancing your visual stream quality. Mastering studio lighting for Twitch streamers is a dedicated craft that requires specific knowledge, equipment, and techniques distinct from audio engineering. By understanding the fundamentals of key, fill, and backlighting, employing smart placement, and avoiding common mistakes, you can significantly elevate your stream's professionalism and engagement. Remember, a well-lit stream not only looks more appealing but also helps convey your personality and content with clarity and impact, ensuring your viewers get the best possible experience.